下载:
wget https://github.com/syncthing/syncthing/releases/download/v1.5.0/syncthing-linux-amd64-v1.5.0.tar.gz
解压后运行 syncthing
生成配置文件后, 将
<address>127.0.0.1:8384</address>
改为
<address>0.0.0.0:8384</address>
开启端口即可访问到
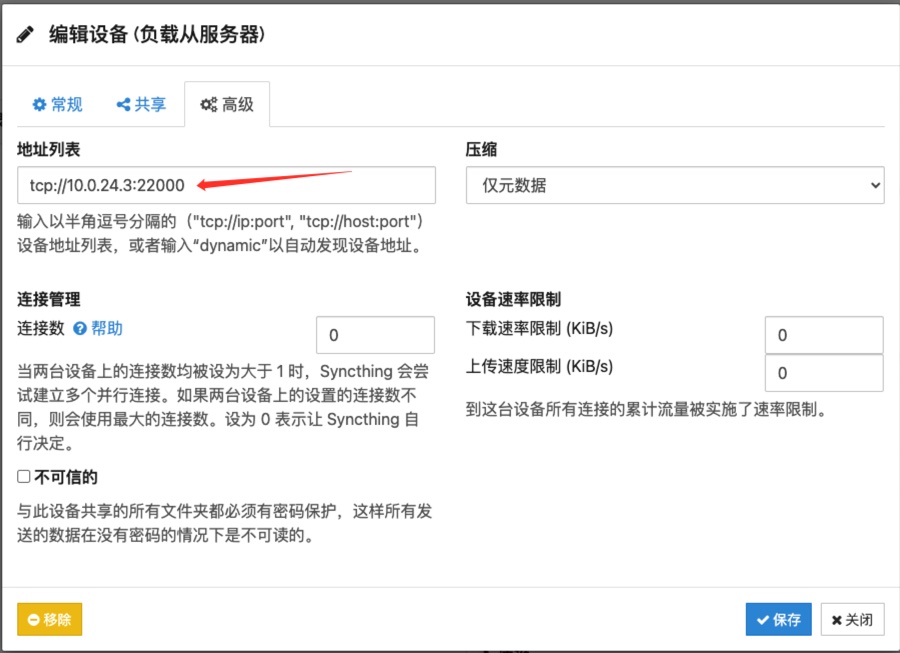
如何配置内网同步
下载:
wget https://github.com/syncthing/syncthing/releases/download/v1.5.0/syncthing-linux-amd64-v1.5.0.tar.gz
解压后运行 syncthing
生成配置文件后, 将
<address>127.0.0.1:8384</address>
改为
<address>0.0.0.0:8384</address>
开启端口即可访问到
如何配置内网同步
先安装依赖
|
1 2 |
"video.js": "^8.12.0", "videojs-mobile-ui": "^1.1.1", |
安装完成后加入到项目
|
1 2 3 4 5 6 7 8 9 10 11 12 13 14 15 16 17 18 19 20 21 22 23 24 25 26 27 28 29 30 31 32 33 34 35 36 37 38 39 40 41 42 43 44 45 46 47 48 49 |
<style> [v-cloak]{display: none;} #my-video { width: 100%; height: 200px; } </style> <template> <div class="cloak" v-cloak> <span>666</span> <div class="h20" style="height:20px"></div> <video id="my-video" class="video-js vjs-default-skin" controls preload="auto"> <source src="https://vjs.zencdn.net/v/oceans.mp4" type="video/mp4"> // 播放 m3u8 <source src="https://d2zihajmogu5jn.cloudfront.net/big-buck-bunny/master.m3u8"> <p class="vjs-no-js"> 为了播放视频,请启用 JavaScript 并使用支持 HTML5 video 的浏览器。 </p> </video> </div> </template> <script> import 'video.js/dist/video-js.css'; import 'videojs-mobile-ui/dist/videojs-mobile-ui.css'; import videojs from 'video.js' // 引入 video.js // https://www.npmjs.com/package/videojs-mobile-ui require('videojs-mobile-ui'); export default { name: 'IndexPage', components: {}, data() { return {} }, methods: { onPlayerReady(player) { console.log('Player ready', player); }, initializeVideoPlayer() { const player = videojs('my-video'); player.fluid(true); player.mobileUi(); } }, mounted() { this.initializeVideoPlayer(); }, } </script> |
具体介绍:
Touch controls:
Fullscreen control:
今天遇到个奇怪的问题
安卓和网页都正常, 苹果手机无法播放视频
使用的是正常的 video 标签,没任何其他不一样的地方
播放视频界面显示 / ,然后查看控制台, 直接是加载失败
我们还咨询了云服务cos 都没找到方案
编码什么的都一致就是无法播放,
查看视频对比发现, 无法播放的视频分辨率很高: 7680 × 2000
可以播放的视频分辨率低, 于是把视频宽度降低到 4k 左右,
可以正常播放了
目前估计是苹果手机不支持大尺寸视频播放,
可以尝试把视频尺寸降低!
首先需要在电脑上安装 opencv
brew install opencv
如何验证是否安装成功
brew info opencv
———-
brew info opencv
==> opencv: stable 4.9.0 (bottled)
Open source computer vision library
https://opencv.org/
/usr/local/Cellar/opencv/4.9.0_7 (971 files, 248.1MB) *
Poured from bottle using the formulae.brew.sh API on 2024-04-29 at 17:42:56
From: https://github.com/Homebrew/homebrew-core/blob/HEAD/Formula/opencv.rb
License: Apache-2.0
==> Dependencies
Build: cmake ✘, pkg-config ✔, python-setuptools ✘
Required: ceres-solver ✔, eigen ✔, ffmpeg@6 ✔, glog ✔, harfbuzz ✔, jpeg-turbo ✔, libpng ✔, libtiff ✔, numpy ✔, openblas ✔, openexr ✔, openjpeg ✔, openvino ✔, protobuf ✔, python@3.12 ✔, tbb ✔, vtk ✔, webp ✔
==> Analytics
install: 14,197 (30 days), 38,891 (90 days), 139,342 (365 days)
install-on-request: 13,479 (30 days), 36,681 (90 days), 130,415 (365 days)
build-error: 44 (30 days)
————
然后安装 nodejs 包,
我使用 nodejs 16.20 一直安装不成功, 后来改为 14.17.6 安装成功
npm install –save –build-from-source opencv4nodejs
需要等待编译, 耗时比较久, nodejs 安装失败了~~使用 python 也可以, 比较简单,
pip install opencv-python
首先, 我们使用 python 的 opencv, 然后简单对图片进行锐化和降噪!
|
1 2 3 4 5 6 7 8 9 10 11 12 13 14 15 16 17 18 19 20 21 22 23 24 25 26 27 28 29 30 31 32 33 34 35 36 37 38 39 40 41 42 43 44 45 46 47 48 49 50 51 52 53 54 55 56 57 58 59 60 61 62 63 64 65 66 67 68 69 70 71 72 73 |
# -*- coding: utf-8 -*- import cv2 import numpy as np import os import random import string import sys import json import os def process_image(image_name, saturation_factor = 1.5, sharpen_factor = 9, output_filename = 'output.jpg'): """ 处理图像:增加饱和度、去噪并锐化图像。 参数: - image_name: 图像文件名,包括路径。 - saturation_factor: 饱和度增加因子,用于调整图像的饱和度。 - sharpen_factor: 锐化因子,用于调整图像的锐化程度。 返回值: 无。函数将处理后的图像显示在窗口中。 """ # 读取图像文件 image = cv2.imread(image_name) # 将图像从 BGR 转换为 HSV 并增加饱和度 image_hsv = cv2.cvtColor(image, cv2.COLOR_BGR2HSV) # 分离 HSV 图像的通道 h, s, v = cv2.split(image_hsv) # 根据饱和度因子调整饱和度 s = np.clip(s * saturation_factor, 0, 255) image_hsv[:,:,1] = s # 将图像从 HSV 转换回 BGR image = cv2.cvtColor(image_hsv, cv2.COLOR_HSV2BGR) # 使用高斯模糊对图像进行去噪处理 image_blur = cv2.GaussianBlur(image, (5, 5), 0) # 应用锐化 kernel 对图像进行锐化处理 kernel = np.array( [[-1, -1, -1], [-1, sharpen_factor, -1], [-1, -1, -1]] ) image_sharpened = cv2.filter2D(image_blur, -1, kernel) # 显示处理后的图像 # cv2.imshow('处理后的图片', image_sharpened) # cv2.waitKey(0) # cv2.destroyAllWindows() # 保存处理后的图片 # 创建 output 目录 os.makedirs('output', exist_ok=True) # 生成随机文件名 def random_string(length): letters = string.ascii_letters return ''.join(random.choice(letters) for i in range(length)) output_filename = 'output/'+ random_string(8) +'.jpg' # 保存处理后的图片 cv2.imwrite(output_filename, image_sharpened); json_data = json.dumps({ "output": output_filename, "full": os.path.abspath(output_filename) }) return json_data; # 调用 process_image 函数 if __name__ == "__main__": img = sys.argv[1] saturation = sys.argv[2] sharpen = sys.argv[3] result = process_image(img, float(saturation), int(sharpen)) print(result) |
处理完成了我们要使用 js 来调用
|
1 2 3 4 5 6 7 8 9 10 11 12 13 14 15 16 17 18 19 20 21 22 23 24 25 26 27 |
const { spawn } = require('child_process'); /**调用Python脚本的函数 * @param {*} saturation 饱和度增加因子,用于调整图像的饱和度。 * @param {*} sharpen 锐化因子,用于调整图像的锐化程度。 * @returns 返回文件的路径 */ function callPythonFunction(img, saturation, sharpen) { return new Promise(function (resolve, reject) { const pythonScript = 'cv.py'; // 替换为您的Python脚本文件名 const pythonProcess = spawn('python3', [pythonScript, img.toString(),saturation, sharpen]); pythonProcess.stdout.on('data', (data) => { const output = JSON.parse(data.toString().trim()); console.log(`处理后的图片路径:`, output); resolve(output); }); pythonProcess.stderr.on('data', (data) => { console.error(data.toString()); reject(); }); }) } // 调用Python函数并传入参数 callPythonFunction('77.jpg', '1.5', '9').then(res => { console.log('======最终处理完的文件========', res); }); |
python 开发的东西, 使用其他语言调用还是很简单的!
|
1 2 3 4 5 6 7 8 9 10 |
ZBMAC-df4b49abc opencv % node index.js 处理后的图片路径: { output: 'output/YpWZtyOj.jpg', full: '/Users/xxx/Desktop/jd/demoDir/opencv/output/YpWZtyOj.jpg' } ======最终处理完的文件======== { output: 'output/YpWZtyOj.jpg', full: '/Users/xxx/Desktop/jd/demoDir/opencv/output/YpWZtyOj.jpg' } ZBMAC-df4b49abc opencv % |
示例代码:
|
1 2 3 4 5 6 7 8 9 10 11 12 13 14 15 16 17 18 19 20 21 22 23 24 25 26 27 28 29 30 31 32 33 34 35 36 37 38 39 40 41 42 43 44 45 46 47 48 49 50 51 52 53 54 55 56 57 58 59 60 61 62 63 64 65 66 67 68 69 70 71 72 73 74 75 76 77 78 79 80 81 82 83 84 |
import robot from 'robotjs'; import tesseract from 'tesseract.js' import jimp from 'jimp'; /** * 屏幕截图并且转为 base64 返回 * @returns */ export const swapRedAndBlueChannel = () => { console.log('开始截图...'); const screenshot = robot.screen.capture(); const swapRedAndBlueChannel = (bmp) => { for (let i = 0; i < bmp.width * bmp.height * 4; i += 4) { // swap red and blue channel [bmp.image[i], bmp.image[i + 2]] = [bmp.image[i + 2], bmp.image[i]]; // red channel; } }; console.log('截图色彩转换...'); swapRedAndBlueChannel(screenshot); const screenJimp = new jimp({ data: screenshot.image, width: screenshot.width, height: screenshot.height, }); screenJimp.write('screenshot.png'); return new Promise((resolve, reject) => { console.log('截图转为BASE64...'); screenJimp.getBase64(jimp.MIME_PNG, (err, base64) => { if (err) throw err; console.log('返回BASE64的截图...'); resolve(base64); }); }); }; /** *识别文字并且返回坐标 * @param {*} base base64 图片 * @param {*} targetText 要寻找的文本 * @param {*} language 识别类型 * chi_sim 中文 * eng 英文 * eng+chi_sim 中英文 */ export const findDeskText = async (base, targetText = '你好', language = 'eng+chi_sim') => { console.log('开始识别文本'); console.log('加载语言...', language); // 设置页面分割模式 // psm 参数控制 tesseract.js 的页面分割模式,它的取值范围是 0 到 13。不是越大越好,而是要根据具体的文本布局来选择合适的值。 // 不同的取值对应不同的分割模式,例如单个块、单个文本行、单个字等等。 // 一般来说,如果您的图片包含了整个文档页面,可以尝试使用较大的 psm 值(例如 6 - 13),以便进行整页的文本识别。 // 如果图片中只包含了单个文本块或者单个行的文本,可以尝试使用较小的 psm 值(例如 3 - 5)来提高识别的准确度。 // 默认是 3 const psm = 3; // 默认值 // 设置 OCR 引擎模式 // 当涉及 tesseract.js 中的 oem 参数时,它代表 Optical Engine Mode(光学引擎模式),用于控制 OCR 引擎的工作模式。具体来说: // 0: Legacy Tesseract only.(仅使用传统的 Tesseract 引擎。) // 1: Neural nets LSTM only.(仅使用基于神经网络的 LSTM 引擎。) // 2: Legacy Tesseract and LSTM.(同时使用传统的 Tesseract 引擎和 LSTM 引擎。) // 3: Default, based on what is available.(默认模式,根据可用情况选择引擎。) // 在实际使用中,您可以根据文本识别的需求和具体的场景选择合适的 oem 值。例如,如果您需要更准确的文本识别,可以尝试使用基于神经网络的 LSTM 引擎。 // 如果需要兼顾速度和准确度,可以选择默认模式或同时使用传统和 LSTM 引擎的模式。 // 默认是 1 const oem = 1; // 默认值 const { data: { text, words } } = await tesseract.recognize(base, language, { psm, oem }); console.log('文本匹配完成...'); for (let word of words) { const { baseline = {}, text = '', choices = {} } = word; const thatWork = text?.trim(); if (thatWork?.indexOf(targetText) !== -1) { console.log(`找到目标`, baseline); console.log(`目标坐标`, choices); return { baseline, choices, text: targetText } } else { console.log(``); console.log(`匹配到文本`, thatWork); console.log(``); } } return null; }; |
tesseract.js 寻找坐标, 然后 robot.js 鼠标移动过去进行点击!
robotjs模块提供的一些方法,用于控制鼠标、键盘以及获取屏幕信息等操作。例如,setKeyboardDelay用于设置键盘输入的延迟时间,keyTap用于模拟按下某个键,typeString用于模拟键盘输入字符串,moveMouse用于移动鼠标到指定位置,getPixelColor用于获取屏幕上指定位置的像素颜色等。这些方法可以帮助你控制鼠标、键盘,以及获取屏幕信息,用于自动化任务、测试和创建交互式应用程序。
|
1 2 3 4 5 6 7 8 9 10 11 12 13 14 15 16 17 18 19 20 21 22 23 24 25 26 27 28 29 30 31 |
setKeyboardDelay(ms: number):设置键盘输入的延迟时间,即按下按键后与释放按键之间的时间间隔。 keyTap(key: string, modifier?: string | string[]):模拟按下并释放指定的键,可以选择性地指定修饰键。 keyToggle(key: string, down: string, modifier?: string | string[]):模拟按下或释放指定的键,可以选择性地指定修饰键。 typeString(string: string):模拟键盘输入字符串,将字符串逐个字符模拟为键盘输入。 typeStringDelayed(string: string, cpm: number):以指定的字符每分钟速度模拟键盘输入字符串。 setMouseDelay(delay: number):设置鼠标操作的延迟时间,即鼠标移动或点击操作之间的时间间隔。 updateScreenMetrics():更新屏幕的度量信息,用于确保鼠标和键盘操作的准确性。 moveMouse(x: number, y: number):将鼠标移动到指定的屏幕坐标位置。 moveMouseSmooth(x: number, y: number, speed?: number):平滑地将鼠标移动到指定的屏幕坐标位置,可以指定移动速度。 mouseClick(button?: string, double?: boolean):模拟鼠标点击操作,可以指定点击的按钮和是否双击。 mouseToggle(down?: string, button?: string):模拟鼠标按下或释放操作,可以指定按下或释放的按钮。 dragMouse(x: number, y: number):模拟鼠标拖动操作,将鼠标从当前位置拖动到指定的位置。 scrollMouse(x: number, y: number):模拟鼠标滚动操作,将鼠标滚轮向上或向下滚动指定的距离。 getMousePos():获取当前鼠标的屏幕坐标位置。 getPixelColor(x: number, y: number):获取屏幕上指定位置的像素颜色。 getScreenSize():获取屏幕的尺寸信息,包括宽度和高度。 |
今天在看抖音开放平台的数据的时候, 看到那个用户挂载列表里, 不显示挂载者的抖音号, 只显示头像昵称,找人特别不方便;
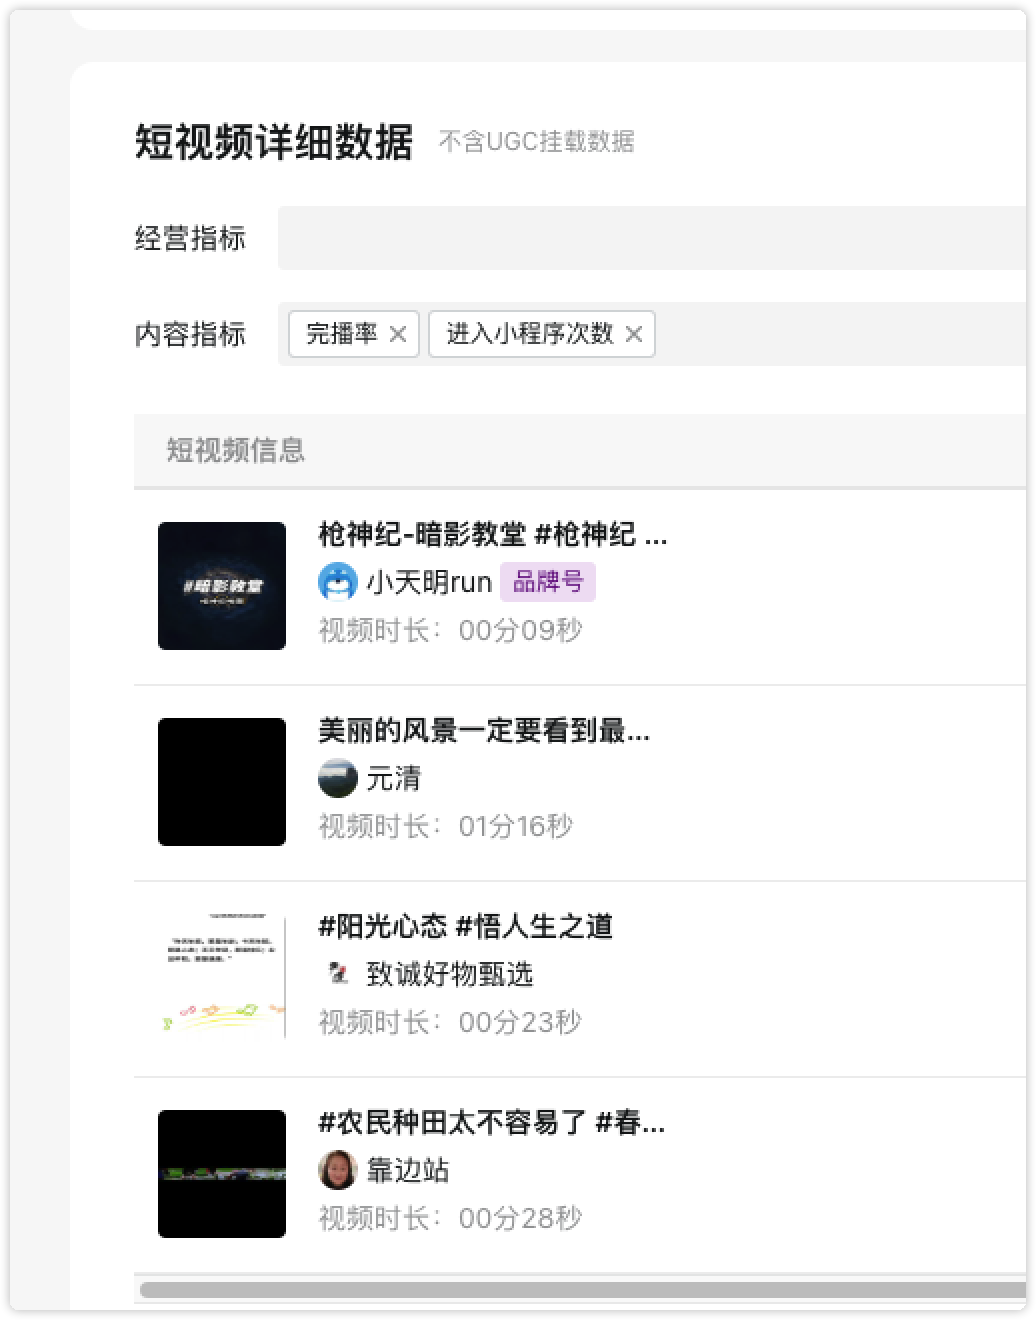 如图, 我跟根据昵称去找人, 搜到一堆人,根本找不见~~~
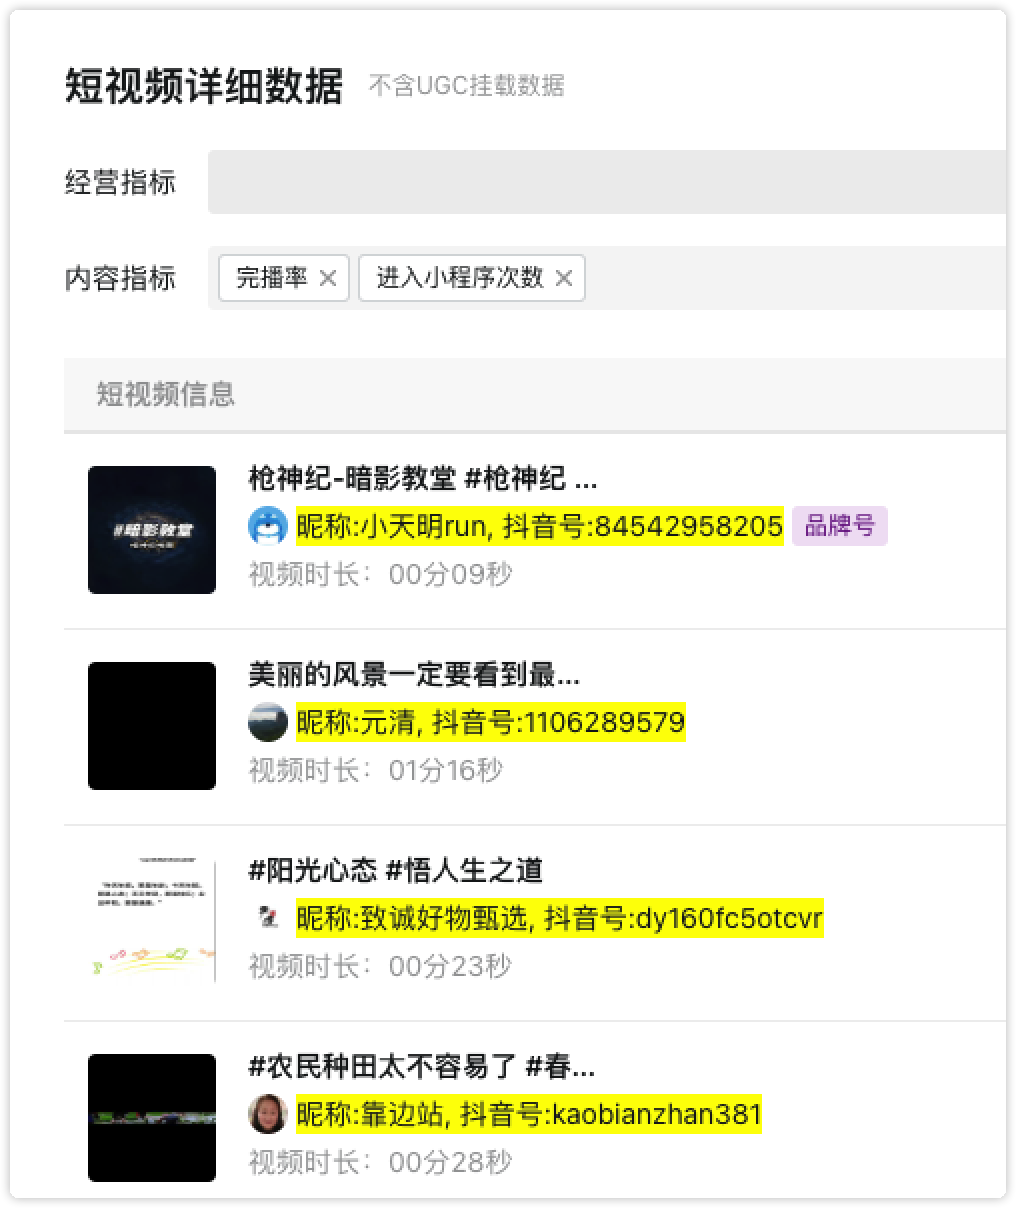
翻了一下 api, 看他接口有返回, 只是没有显示出来
于是想到开发个tampermonkey 插件来解决 !
插件流程也很简单, 我监听他这个列表数据接口, 接口数据返回, 我就拦截并且把抖音号插入到列表里!
简简单单写几行代码!
|
1 2 3 4 5 6 7 8 9 10 11 12 13 14 15 16 17 18 19 20 21 22 23 24 25 26 27 28 29 30 31 32 33 34 35 36 37 38 39 40 41 42 43 44 45 46 47 48 49 50 51 |
// ==UserScript== // @name 监听接口数据示例 // @namespace https://developer.open-douyin.com/ // @version 0.1 // @description 监听指定接口返回数据并备份数据在变量里 // @match https://developer.open-douyin.com/bff_api_v2/app/data/dataService/getShortOrLiveDataWithId\ // @match *.open-douyin.com/* // @grant GM_xmlhttpRequest // ==/UserScript== (function() { const findClass = (txt, append = '')=> { const searchChar = txt; // 获取页面上所有的 div 元素 const divs = document.querySelectorAll('span'); // 遍历每个 div 元素 divs.forEach(div => { // 检查 div 的文本内容是否包含搜索的汉字 if (div.innerText.includes(searchChar)) { // 如果包含,则执行相应的操作 console.log("找到包含汉字 '汉' 的 div:", div); // 例如,你可以修改其背景色 div.style.backgroundColor = "yellow"; div.innerText = `昵称:` + searchChar + `, 抖音号:` + append; } }); } var open = XMLHttpRequest.prototype.open; XMLHttpRequest.prototype.open = function(method, url, async, user, pass) { this.addEventListener('readystatechange', function() { if (this.readyState == 4 && this.status == 200) { var oldResponse = this.responseText; // 修改响应数据 if(url === `/bff_api_v2/app/data/dataService/getShortOrLiveDataWithId`){ const list = JSON.parse(oldResponse); console.log('原始响应:', list); console.log(`url`, url); const useList = list?.data?.DataList ?? []; setTimeout(_=> { useList.map(val=> { findClass(val.item_aweme_name, val.item_aweme_shortid) }) }, 1000) } } }, false); open.apply(this, arguments); }; })(); |
最后把昵称标记为黄色, 并且把抖音号追加显示出来~
首先 nuxt.config.js 中的 build 配置
|
1 2 3 4 5 6 7 8 9 10 11 12 13 14 15 16 17 |
build: { analyze: true, assetFilter: function (assetFilename) { return assetFilename.endsWith('.js'); }, filenames: { app: ({ isDev }) => isDev ? '[name].js' : 'js/[name].[contenthash].js', chunk: ({ isDev }) => isDev ? '[name].js' : 'js/[name].[contenthash].js' }, components: false, extend(config, { isDev, isClient }) { config.externals = { 'element-ui': 'ELEMENT', 'vue': 'Vue' } } } |
header 中增加 script
|
1 2 3 4 5 6 7 8 |
link: [ { rel: 'icon', type: 'image/x-icon', href: '/favicon.ico' }, { rel: 'stylesheet', href: 'https://cdn.bootcdn.net/ajax/libs/element-ui/2.15.14/theme-chalk/index.min.css' } ], script: [ { src: 'https://cdn.bootcdn.net/ajax/libs/vue/2.7.14/vue.min.js', type: 'text/javascript'}, { src: 'https://cdn.bootcdn.net/ajax/libs/element-ui/2.15.14/index.min.js', type: 'text/javascript' } ] |
插件中的 element 插件也要保留;
|
1 2 3 4 |
import Vue from 'vue'; import ElementUI from 'element-ui'; import('element-ui/lib/theme-chalk/index.css'); Vue.use(ElementUI); |
解决刷新页面后渲染出源代码问题
<div class=”cloak” v-cloak></div>
<style>
[v-cloak]{display: none;}
</style>
具体实现代码如下:
|
1 2 3 4 5 6 7 8 9 10 11 12 13 14 15 16 17 18 19 20 21 22 23 24 25 26 27 28 29 30 31 32 33 34 35 36 37 38 39 40 41 42 43 44 45 46 47 48 49 50 51 52 53 54 55 56 57 58 59 60 61 62 63 64 65 66 67 68 69 70 71 72 73 74 75 76 77 78 79 80 81 82 83 84 85 86 87 88 89 90 91 92 93 94 95 96 97 98 99 100 101 102 103 104 105 106 107 108 109 110 111 112 113 114 115 116 117 118 119 120 121 122 |
<!DOCTYPE html> <html lang="en"> <head> <meta charset="UTF-8" /> <meta name="viewport" content="width=device-width, initial-scale=1.0" /> <title>Document</title> <script src="https://unpkg.com/obs-websocket-js@5.0.5/dist/obs-ws.min.js"></script> </head> <body> <button id="btn">打开</button> <script> const makeInit = () => { const address = `ws://127.0.0.1:4455`; console.log('OBSWebSocket连接中', address) return new Promise((resolve, reject) => { const obs = new OBSWebSocket(); obs .connect(address) .then((res) => { console.log(`链接成功`, res); resolve(obs); }) .catch((err) => { console.warn(err); }); }); }; const sleep = (time = 1) => { return new Promise((resolve) => { setTimeout((_) => resolve(), time * 1000); }); }; // 获取视频; const getVideo = async (content = {}) => { console.log(`开始执行`); return new Promise(async (resolve, reject) => { console.log(`获取参数`, content); const { length = 10, direction, text, status, mp4, id, wait = 2, queryKey = '', } = content; // 横屏 const directionConfig = +direction === 1 ? { width: 1280, height: 720 } : { width: 720, height: 1280 }; const obs = await makeInit(); const playLink = `https://www.baidu.com`; const sceneName = "场景"; const inputName = '浏览器'; console.log(`全景播放地址`, playLink); console.log(`设置屏幕宽高`, directionConfig); const setting = { baseWidth: directionConfig.width, baseHeight: directionConfig.height, outputWidth: directionConfig.width, outputHeight: directionConfig.height, } const result = await obs.call('SetVideoSettings', setting); console.log(`全局设置`, setting); // 新增一个场景! try { await obs.call('CreateScene', { 'sceneName': sceneName }); } catch (e) {} // 切换到这个场景 // await obs.call('SetCurrentPreviewScene', { 'sceneName': sceneName }); const browser = { sceneName: sceneName, inputName: inputName, inputKind: 'browser_source', inputSettings: { url: playLink, ...directionConfig, }, }; console.log(`新增浏览器`, directionConfig); try { await obs.call('CreateInput', browser); } catch (e) { alert(e.message); console.log('没有创建场景'); return ; } console.log(`浏览器打开成功`); await sleep(wait); console.log(`等${wait}秒再执行...`); await obs.call(`StartRecord`).then((_) => { console.log(`📍开始录制视频`); const time = 1000 * parseInt(length); console.log(`共录制时长`, time); setTimeout((_) => { console.log(`现在开始录制`, time); obs.call(`StopRecord`).then(async ({ outputPath }) => { console.log(`结束录制视频`, outputPath); await obs.call('RemoveInput', { inputName }); console.log(`删除浏览器`); await sleep(5); console.log(`返回录制视频地址`, outputPath); resolve(outputPath); }); }, time); }); }); }; const callBack = (mp4, content = {}) => { const { id } = content; console.log(`生成成功的mp4`, mp4); }; document.getElementById('btn').addEventListener('click', getVideo); </script> </body> </html> |
功能比较简单, 可以控制 obs 打开百度录制 10 秒视频后自动关闭!
一个简单的脚本, 将 uniapp 项目中所有的 rpx 单位转为 px, 以用来视频大屏。
|
1 2 3 4 5 6 7 8 9 10 11 12 13 14 15 16 17 18 19 20 21 22 23 24 25 26 27 28 29 30 31 32 33 34 35 36 37 38 39 40 41 42 43 44 45 46 47 48 |
const fs = require('fs'); const path = require('path'); function processFilesInFolder(folderPath) { fs.readdir(folderPath, (err, files) => { if (err) { console.error(err); return; } files.forEach(file => { const filePath = path.join(folderPath, file); fs.stat(filePath, (err, stats) => { if (err) { console.error(err); return; } if (stats.isDirectory()) { processFilesInFolder(filePath); // 递归处理子目录 } else if (file.endsWith('.vue')) { fs.readFile(filePath, 'utf8', (err, data) => { if (err) { console.error(err); return; } const updatedData = data.replace(/(\d+)rpx/g, (match, p1) => { const newValue = parseInt(p1) / 2; return `${newValue}px`; }); fs.writeFile(filePath, updatedData, 'utf8', err => { if (err) { console.error(err); } else { console.log(`File ${file} updated successfully.`); } }); }); } }); }); }); } const rootFolder = './src'; processFilesInFolder(rootFolder); |